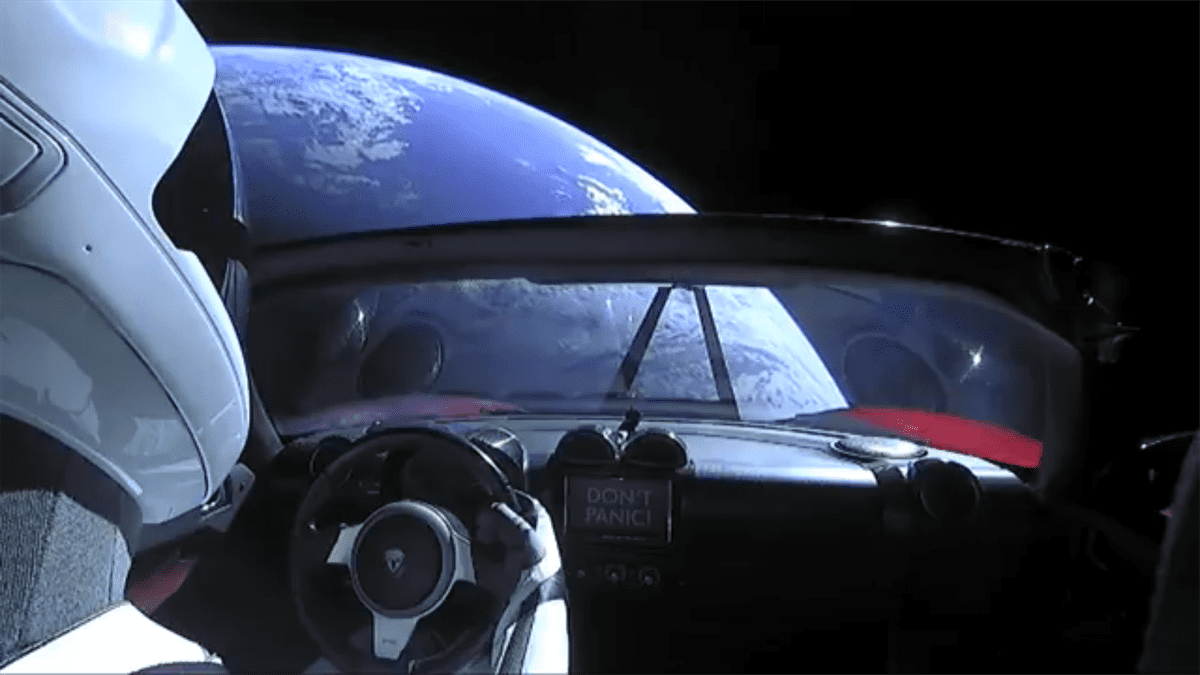
LAUNCHING STARMAN FROM SPACEX
If you’ve been “off world” for a bit, you may have missed the launch. Here is a highlight reel to catch you up. The rocket, called the Falcon Heavy, sent the Tesla Roadster to Mars short the MB Quart Audio System upgrade.

THE LEADER – ELON MUSK
After years of planning and research, Elon Musk, South African-born Canadian American business magnate, investor, engineer and inventor, decided to launch his personal ride into orbit around the sun, between the Earth and Mars. Mr. Musk is the founder, CEO and lead designer of SpaceX, co-founder, CEO and product architect of Tesla, Inc. and chairman of SolarCity.

Mr. Musk admitted to no one we’ve ever acknowledged or can get a commitment from, that his teams completely forgot to schedule time during the meticulous planning to upgrade the audio system in the Tesla Roadster.
The MB Quart team and I have worked diligently to tap into the stock electronics for control but use a very efficient amplifier for powering a shallow subwoofer. As of the publish date of this blog, we are setting to upgrade all the speakers with the MB Quart Z-Line next. With the WideSphere™Technology and the ceramic coated, titanium dome tweeters, they are going to be incredible. I just need to resolve some fitment and electronic issues as the stock speakers are all 2 ohm. It surely adds to the efficiency and SPL, but wreaks havoc on amplifiers and create a bit more heat that we Tesla owners prefer. Watch for updates to follow. Let’s get back onto the subwoofer project.
LOADED FOR ORBIT

The following is everything I did, along with a detailed parts list and a step by step “how to”, so you too can improve the audio system in your Tesla well beyond that of another Tesla on Earth, orbit or heading to Mars.
TESLA HEADQUARTERS

The day I picked up my 2017 TESLA MODEL S 75D I stopped at “Starman’s” home base, SpaceX headquarters and Tesla Design Center in Hawthorne, CA. Incredible experience. Yup, that’s my head shadow…
INSTALLING AN MB QUART AUDIO UPGRADE
Notes: Car needs to have the Premium OEM Sound System, buy can be adapted to work on the non-premium sound system by grabbing the speaker output to the front door speaker as the source to the Line Output Converter. This adaptation is not covered in this guide.
These instructions will also work with the same basic premise for a Model X; however, a change in enclosure may be required. In regards to the new Model 3, these instructions have not been tested on at this time; therefore, we are unable to say what would work for you.
Oh, and for all of you “non-Tesla” owners that LOOOOOVE to point out people’s shortcomings and mistakes, a “frunk” is a real word, you just haven’t learned it yet. You can Google that.

This is a typical “refreshed” (Late 2016+) Tesla Frunk.
This install will also work in older Model S’s. Your 12v Battery is not in the center of the frunk; rather, it is up under the passenger side dash and is accessible from the frunk after pulling off all the panels.
GETTING STARTED
Parts Needed for an MB Quart Audio Upgrade in a Tesla:
- MB Quart 10 inch DVC Shallow 2 x 4 ohm #MS1-254 subwoofer (you can also use the Discus line)
- MB Quart 400w Mono Powersports Amp #NA2-400.1
- Audio Control LC2i Line Output Converter
- Tesla Subwoofer Enclosure from JJ’s Car Audio (Juan @ 626-278-2631)
- GS Audio 10″ Black Grill
- 2ch RCA Gold Cable (3ft)
- 8 gauge Power Wire (about 30ft)
- 8 gauge Ground Wire (about 10ft)
- Ring Terminals for Power and Ground
- 40 amp Car Audio Circuit Breaker
- 16 gauge Stranded Automotive Wire in Red, Black, and Blue. (15ft each)
- Small piece of Automotive Carpet for Amp Rack.
- Small piece of 1/4 ” Plywood for Amp Rack
- Small wood screws to hold amp and LOC to Amp Rack
- Spray Glue for Carpet
- Flexible Wire Loom from your local auto store (10 ft approx.)
- Band-Aids for your various scraped knuckles.
- 14 gauge Automotive Speaker Wire, we used GS Audio Flexible.
Editor’s note, since this build began, MB Quart’s sister brand also launched a high performance, shallow subwoofer and compact amplifier. Check them out here at Hifonics Brutus Shallow Subwoofers and compact full range D class, high efficiency Hifonics THOR Amplifiers.
Tools Needed for an MB Quart Audio Upgrade in a Tesla:
- Metric Socket Set with Extensions (You can get this at Harbor Freight)
- Basic Flat and Phillips Screwdriver Sets (You can get this at Harbor Freight)
- Automotive Plastic Panel Puller Kit (Available on Amazon for about $12
- Wire Cutters / Crimps (I used Klein Brand)
- Small Handheld Saw to cut your amp rack wood plate (Any Tool Store)
- Scissors to cut carpet (Borrow from your Wife, just don’t let her know!)

First, don’t let this scare you; all you need is some mechanical aptitude and ability to understand basic electrical instructions.
Now let’s gets started… and make some bass.
STEP 1: Remove the plastic panels from your frunk. Most of these pop out easily. Some cars may take a little extra work to remove them.

This panel covers the battery. There are two small clips at the front of the duct and 3 small push in clips on top that hold this down. There are also tubes on either side for drainage that have to be pulled off by hand.
The battery is under this duct which also has to be removed.

STEP 2: Locate your battery, and its positive terminal.

In the next shot you can see where I mounted my circuit breaker. I still have easy access to it should it need to be reset. It is accessible without any tools.

Below you see my main fuse box also remains accessible. Yours will not have the small box in front of the fuse box; this is for my dash cam controller.

STEP 3: Find a suitable place to mount the circuit breaker and route the wire from the battery. (Don’t hook up the power wire until the very end, as we don’t want any sparks to fly. I prefer to keep the magic smoke inside my electronics and not let it out.)
STEP 4: Route your power wire to the back of your car. You will need to find a suitable path to do this. I ran mine under the door sill panels and snuck the wire up under the rear carpet and into the lower storage area. This took a little ingenuity to do (along with some various cuss words and scraped knuckles)
STEP 5: Below you will find some of the pictures I took with the carpet and panels pulled up in the trunk area.
STEP 6: You will be pulling up the carpeting and side panels. All of these snap together; just take your time to find the order for your vehicle and carefully set them aside as you take the car apart.

Take your time when pulling apart internal panels.

Consider taking a series of pictures as you dismantle. It will help you when you reassemble.

STEP 7: Now we will be pulling out the factory sub; this is only temporary to make it easier to work on and to tie into the subwoofer speaker level wires.
STEP 8: You will be removing the 3-10mm bolts in the indicated areas. Don’t pull the enclosure out just yet, you still have to disconnect it.

STEP 9: You won’t be messing with any of the wires or controller systems in this picture; this picture is just for reference.

Reference these pictures so your dismantling process looks the same as mine.

STEP 10: Disconnect the speaker wire from the factory sub; it’s just a simple clip connector.

STEP 11: Carefully remove the enclosure; you will be lifting up and out.
STEP 12: Pull back some of the protector foam on the wire to expose the two leads.

STEP 13: Your wire color MAY be different, Tesla has a penchant for not using the same color of wires across years and from model to model. This is where you will remove the bolts from the factory subwoofer, take it out and follow the leads to the subwoofer. The subwoofer leads will be marked + and -; make a note of the colors used for each pole, as you will need this in the next step.
STEP 14: Cut off about a 6 foot piece of speaker wire and attach to the leads on the subwoofer wires using solder and heat shrink tubing. Again, make note of which lead you attached to positive and negative as you will put these into the Line Output Converter.


STEP 15: Now you can reinstall the subwoofer back into the car and bolt it down. Route the speaker wire you just attached into the lower storage area for later attaching to the LOC.
STEP 16: Before you bolt down the final outside bolt on the factory sub, you will be making a ground wire from the 8ga ground with ring connector you purchased earlier. Route this wire to the same storage area making sure to give yourself extra wire that can be cut down later.

Grounding cable on a ring terminal added

STEP 17: The next step is to cut a panel from the purchased piece of plywood that will fit into the little well area under the storage area. I cut a piece of cardboard until it fit perfectly, then cut my panel.

STEP 18: This is the amp rack with LOC mounted to it after its been carpeted.

STEP 19: The amp rack piece slides up nicely out of the way in the area pictured above. Wire up the amp power, ground and LOC power and ground per the product instructions. You will also attach the speaker wire from the factory sub that you routed over earlier.
STEP 20: Don’t forget to wire up the RCA cable between the amp and LOC.
STEP 21: Now comes the part to prep the subwoofer for installation into the enclosure from JJs.
STEP 22: Wire the sub up in a 2 ohm configuration by following the instructions that came with the subwoofer. Basically, you will be tying the POS to POS and NEG to NEG posts and your main lead from the enclosure will be hooked up to one side of the subwoofer as shown below.

Follow the wiring guide in the manual that is included with your subwoofer.

STEP 23: Now install the subwoofer into the enclosure paying close attention to its orientation. Pre-drill the holes before mounting it. The sub does not come with screws; we used standard wood screws. Follow the instructions for which holes to drill and screw down. Remember you have a trim ring to install as well.

STEP 24: Now install the grill that you purchased.

STEP 25: Carefully set the subwoofer in place and make sure it fits nicely. Then, pull it out again so you can wire up the speaker wires that will go to the amp.

STEP 26: Put the trim work back together in the back of the car.
STEP 27: Connect the speaker wires from the amp to the sub.
STEP 28: Set the subwoofer in place.
STEP 29: Double check all your connections on the amp rack to make sure all needed connections are secure. Leave it out in the storage area so you can tune it after you hook up the power.
STEP 30: Go back to the frunk front and attach the power wire to the battery. Make sure that when you turn on the media center in the car, the LOC and AMP power up. Keep the volume down as it’s not quite ready to jam yet.
STEP 31: Reassemble the front of your cars panels, button up your wiring and use zip ties where needed.
STEP 32: Now go to the back and place the subwoofer into its home and make the final connection to the amp.
STEP 33: It is now time to tune the LOC to your car’s system and adjust the input levels of the amp per the product instructions.
STEP 34: Once you have reached your desired sound level and it sounds clean without distortion, you are ready to have that extra bass in your Tesla and jam in your ultra quiet EV.
STEP 35: This is the finished product; now go pat yourself on the back for a job-well-done. Plus, you can feel good that here on Earth you have the best sounding Tesla. OK, probably in the Universe. Poor Starman.

Follow the Swenka Tesla in orbit around the Phoenix, AZ Valley plus a few of Scott’s other vehicle projects here on Facebook
Special Shoutout to JJ’s Car Audio for the killer sub enclosure. You can check them out on Instagram
STARMAN LIVE FEED FROM ORBIT
Watch Starman in his Tesla anytime you get the urge. One downside, what will be the re-sale value with 80 billion miles??
Keep up with Elon and all things SpaceX and Tesla on Mr. Musk’s twitter feed. For those interested, here is the shot of Starman’s Tesla orbit around our sun.

Thanks for reading. We are looking forward to reading everyone’s comments and offering insight on your installation. Here’s a parting shot from my trip going from Tesla HQ to my base in AZ. This is Will Rogers State Beach in SoCal. A beautiful place to see and watch Starman… out there… somewhere…

by: SCOTT SWENKA


